Import Options in InfoSewer and H20Map Sewer
There are two ways data can be imported into . The first is to import data as a background map to InfoSewerH20Map Sewer while the second is to import data that will become an InfoSewerH20Map Sewer element (pipe, pump, manhole, wet well).
Click on any hyperlink below to learn more.
· Import Data Elements (Pipes, Nodes, etc.)
InfoSewerH20Map Sewer![]()
Importing Background Data
Data can be imported as background information to H2OMAP Sewer. Background data is essential to network digitization and allows the user to easily place facilities with a spatial relationship.
To |
Do This |
| Import a background map, AutoCAD file, ESRI Shapefile, image file or other GIS data. | From the Control Center, go to the Map Legend tab |
The user will then be prompted as to which type of file is to be imported as background data to the H2OMAP Sewer project. As long as the file or image being imported has the same spatial rectification, the user will see the background appear behind the current H2OMAP Sewer project.
If the background map has different coordinates, use the Zoom to Full Extents icon to see where the background map was inserted. H2OMAP Sewer does not have spatial rectification capabilities for an imported background. This means that the background map will need to be shifted in its native software prior to insertion into the project.
Once a background file has been imported into the H2OMAP Sewer project, its properties are able to be modified through the Map Legend by highlighting the imported file on the map legend and clicking on the Edit Legend icon at the top of the Map Legend dialog box. Click here to learn more about the Map Legend.
![]()
Importing Data Elements
There are several ways to import data elements, depending on the type of file that is to be imported.
ArcInfo Generate File
If the import file is an ArcInfo Generate file, then from the Exchange menu, point to Generate then select Import. At this point the user will be prompted to select the elements to be mapped (links and/or nodes) and the location of the import files. It is important to note that when generate files are created, they do not contain the database information from ArcInfo. To generate database information from ArcInfo, the user must also export a delimited text file for import into H2OMAP Sewer.
The following illustrates a sample node ESRI generate file. Refer to the ESRI Arc/Info documentation for more information on the Generate file format:
Node Generate File
In the following illustration, several nodes are written to the Generate file. For each node, the ID, X-coordinate, Y-coordinate, and a placeholder for a Z value are provided:
1 1678.750000 1703.500000 0.000000
3 1993.750000 1703.500000 0.000000
5 2193.250000 1703.500000 0.000000
7 3030.000000 1715.000000 0.000000
END
During the import of an ArcInfo Generate file, the user may select multiple options as they relate to H2OMAP Sewer Preferences. One of the options is to Disable the Auto Length Calculation. If this option is disabled, then all lengths for pipe segments will be created as listed in the generate file. If enabled, the lengths for the imported pipe segments will be established as they appear spatially in the H2OMAP Sewer project.
When using the generate format, only those records in the generate file that have matching records in the H2OMAP Sewer database tables will be imported into H2OMAP Sewer. Once the generate file is imported, the user must then import the delimited text file through the import manager to match H2OMAP Sewer graphics with the database data. To do this, see the Import Manager below.
Import Manager
All other data elements are imported with the Import Manager. Here the user can import from either an ESRI Shapefile, MapInfo MIF/MID or an ASCII delimited text file.
To run the Import Manager, from the Exchange menu, select Import Manager.
The Import Manager itself is a two-step wizard that guides the user through the import process.
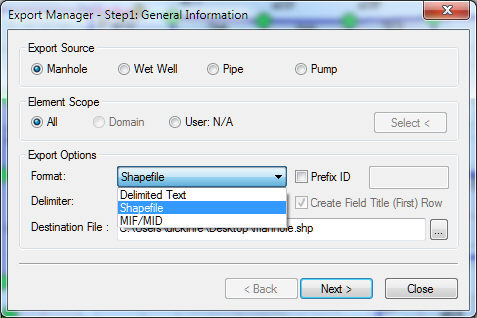
Step 1 – General Information
The first step of an import is to identify which InfoSewerH20Map Sewer element and import options are desired.
Click on any portion of the dialog box below to learn more.

Choose the desired options and then choose the Next button to continue to step 2.
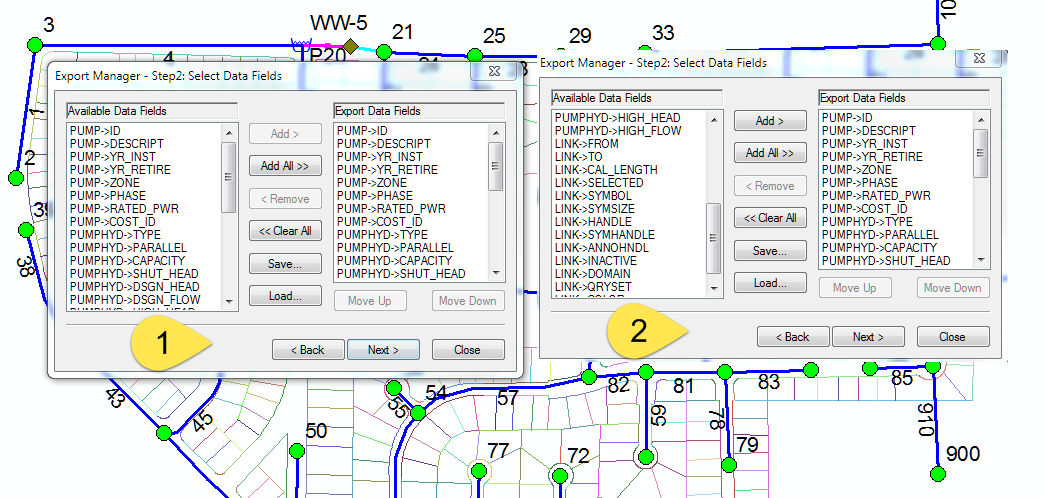
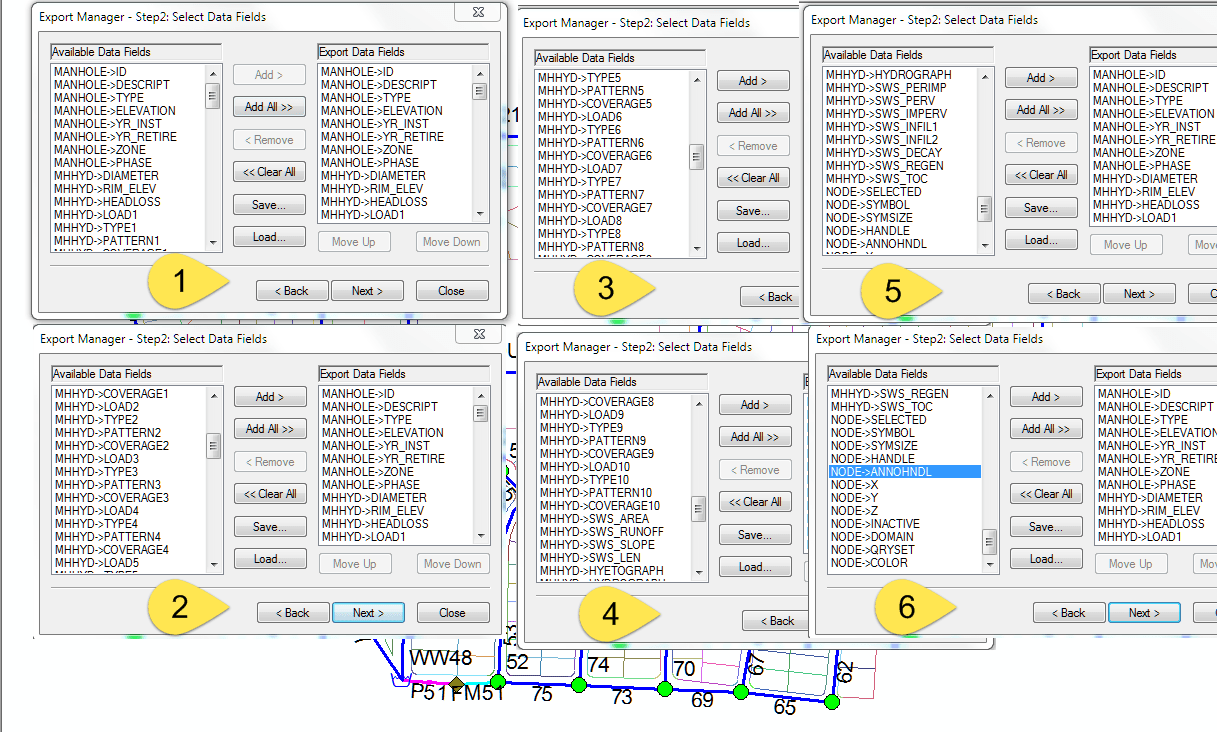
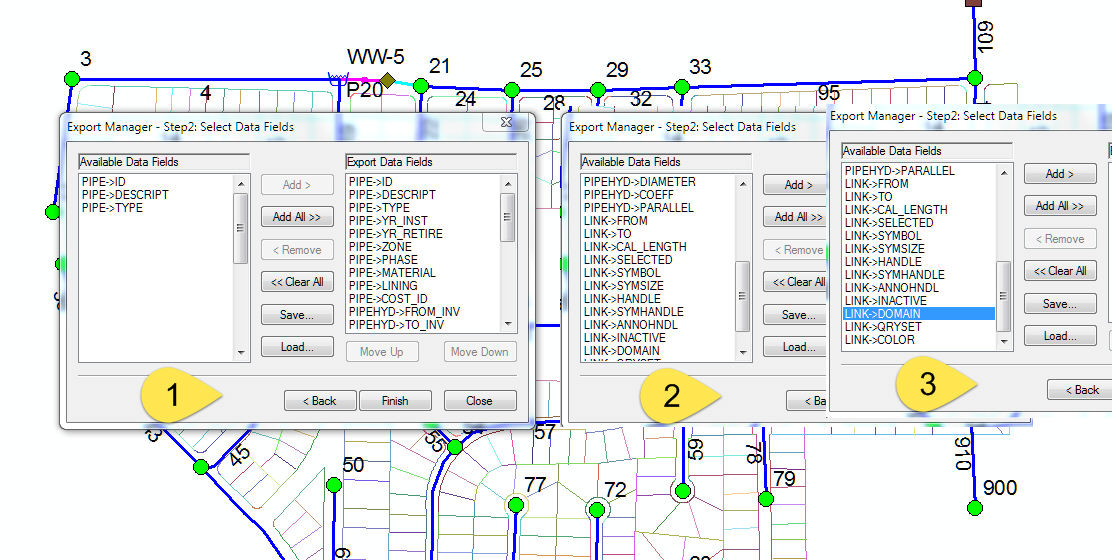
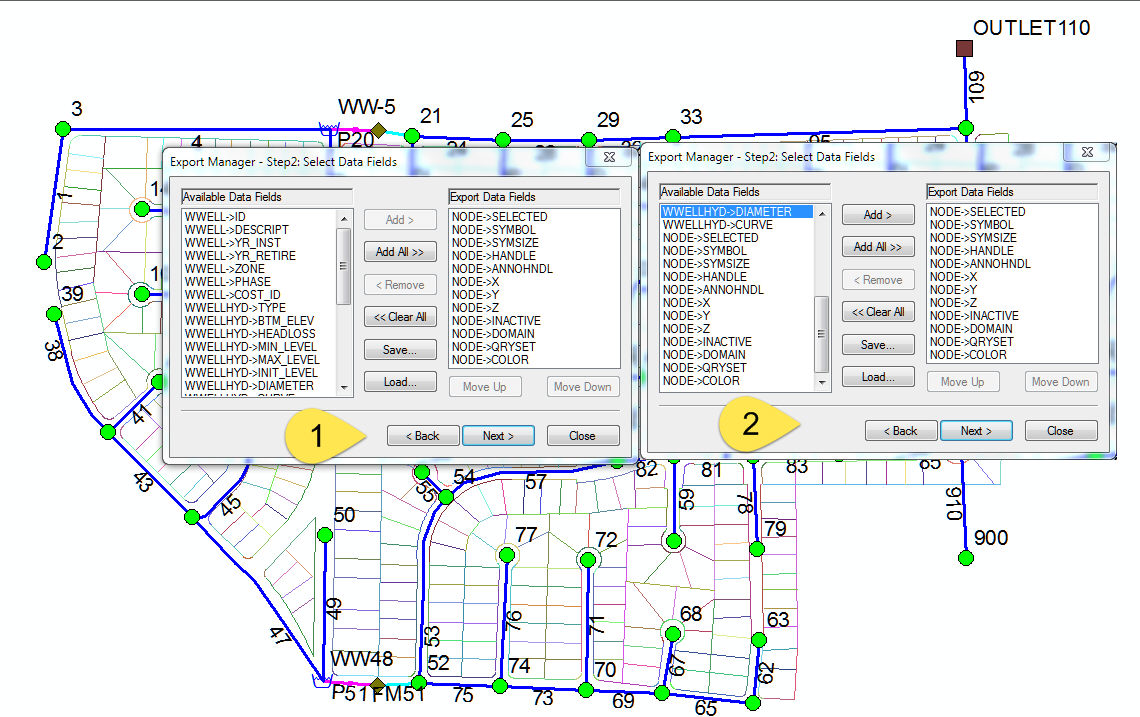
Step 2 – Define Data Field Mapping
The second step is to define which fields will be mapped to their respective InfoSewerH20Map Sewer database fields.
Click on any portion of the dialog box below to learn more.

Once all of the database fields have been mapped, select the Finish button to complete the import process.
(Note: Be sure to correctly map the ID field, which contains the unique identifier for each H2OMAP Sewer component. This ID field must also be present in the file being imported, since it is the only unique identifier in the database.)
![]()
Issues to Consider When Importing GIS data into H2OMAP Sewer
If you import data from a GIS you should ensure the following before importing into H2OMAP Sewer:
1. All links (arcs, lines) in the GIS are connected to two unique nodes.
2. All links in the GIS are snapped together where those links represent connected pipes in your sewer collection system. In other words, be sure that where two or more pipes should be connected, those pipes should share the same node in the GIS or other external database. It is common to find that in the GIS those two or more pipes are actually dead-end pipes, each pipe with a unique, different node, and those nodes simply share the same location, appearing to a map viewer as being the same node.
3. There are no disconnected nodes in the GIS database. Each node should be connected to at least one link in the GIS.
4. The graphical representation of the pipes in the GIS corresponds to the values in your database that represent the from- and to-node identifiers. In other words, if a pipe in your GIS database has a from-node value of “1” and a to-node value of “2”, then the graphical representation of that pipe on the map display shows that pipe starting at node “1” and ending at node “2”.
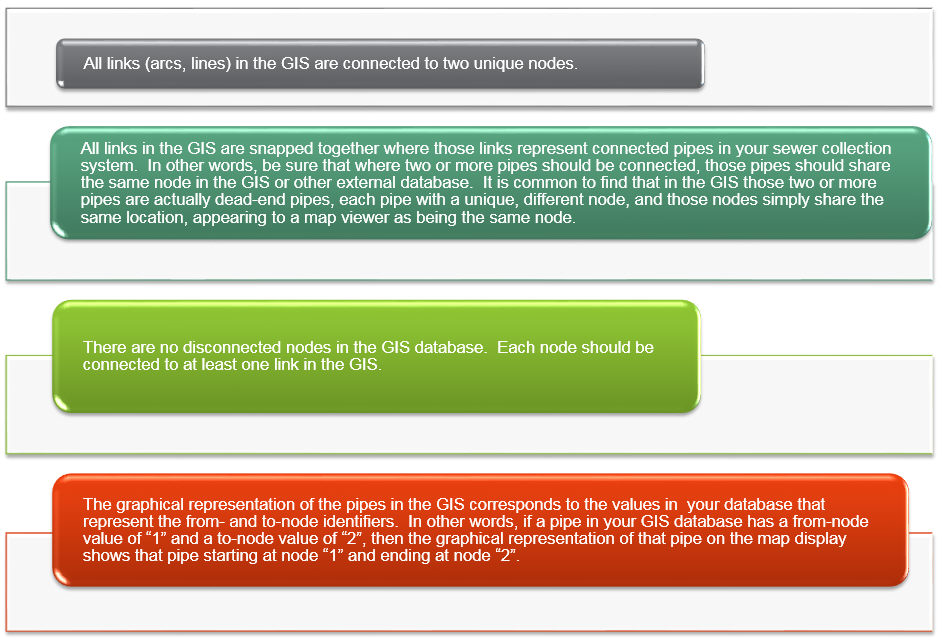
(Note: If you do not meet the above-listed criteria, you may experience one or more errors when running a simulation in H2OMAP Sewer.)
The two most common situations that may occur if you do not meet the above-listed criteria before importing are the following:
1. Isolated Node – One or more nodes are disconnected from the network.
2. Coincident Nodes – Two or more nodes share the same location, appearing to a viewer as a single node.
InfoSewerH20Map Sewer has tools that will help you correct these problems in the event that your GIS is too burdensome. From the Utilities menu, point toConnectivity and select Orphan Nodes or Orphan Links. By doing this, the program will identify which nodes are not connected to links and which links do not have both an upstream and downstream node. Once these facilities are identified, you can then correct the errors by moving nodes or redrawing the pipes.
At any point, the user can also update the graphics from the database data and vice versa. Click here to learn more about the utilities within InfoSewerH20Map Sewer.
This will prove useful for sharing your modeling efforts with your organization via enterprise or web (Intranet or Internet) applications.
Export Options are:
· CSV Files
· Shapefiles
· MIIF/MID
· for Pumps, PIpes, Wet Wells and Manholes
Manhole Export and Import
Pipe Export and Import
Wet Well Export and Import
Pump Export and Import