Attribute Browser Tools
The Attribute Browser has the following buttons/tools. The tools change depending on the type of Element.

Each one of these buttons is briefly described below:
| Button | Name | Description |
| Select Element / Select Elements / Select Domain |
|
|
| Find by ID | This button enables the user to search a network element by its ID or Description and zooms in to the element. This feature is same as the Locate Element functionality available from the Utility Menu. | |
| Zoom to an Active Node | Zooms the drawing area map in to the node or the link currently active. | |
| Open Default | Using this feature, the user may review the default attribute data used when new data elements (e.g., Rain Gage, Junction, etc) are created. Click on the button, and select the data element type for which you need to review the default settings on the resulting dialog editor, then click OK. The Atrribute Browser displays default settings for the data element , and allows you to modify the settings. | |
| Save as Default | This tool enables the modeler to save attributes of a data element (e.g. Subcatchments) as a default so that the same attribute data is used when new data element, in this case Subcatchment, is created. | |
| Save Current Record | By clicking on this button, the user saves the latest changes made on the Atrribute Browser. | |
| Reset | Reverts any changes made on the Atrribute Browser to its previous state at the time of the last save operation. Once a save operation is performed, any changes made to the current record become permanent. | |
| Delete | Deletes the active data element. | |
| Recall | Recalls the last deleted data element. | |
| Report | Opens the report manager and displays output report for the selected element for a maximum report duration of one day. Click on an element for which you wish to see output report, and click on this tool. | |
| Graph | Opens the report manager and displays output graph for the selected element for a maximum report duration of one day. Click on an element for which you wish to create an output graph, and click on this tool. | |
| Tools | Using this command, the user can access certain dialog editors provided by InfoSWMM to provide attribute data related to the currently active data element (e.g., Junction, Conduit, Subcatchment, etc) that may or may not be provided through other tool buttons in the Atrribute Browser. Click on the Down Arrow icon 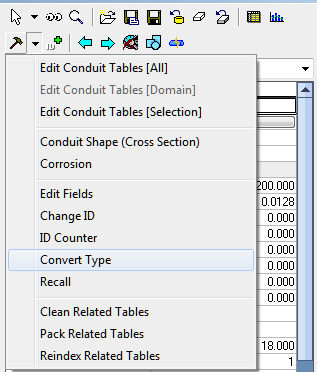
Edit Fields - Customize database tables. See Edit Fields. Change ID - Change the ID of this data element. See Change ID. Convert Type - Change the data element type. See Convert Type. Clean Related Tables - Removes database records without matching network components in the map display. See Clean Database. Pack Related Tables - Pack database records of components that have been marked for deletion. Records must be packed to be permanently removed. See Pack Database Reindex Related Tables - reconstructs internal database index. See Reindex Database. |
|
 |
ID Counter | Use this feature to set the automatic ID assignment option by selecting the Prefix, Id counter, and the increment steps as you wish. |
| Open Google Maps | Choose a junction then click this button to open an internet window with Googlet Maps with the junction at the center of the map. Note: The correct coordinate system must be specified for the data frame for the feature to work.
Before using the feature you must specify the coordinate system that the current project is using. If the map elements do not have the correct coordinates, you need to:
|
|
| Hot Link Tool | ||
| Back | Using this button the modeler can browse backward (from the bottom of the list) through the data elements listed in the History Combo Box ( |
|
| Forward | Using this button the modeler can browse forward (from the top of the list) through the data elements listed in the History Combo Box ( |
|
| Clear History | Clears or empties the History Combo Box. | |
| SUBCATCHMENT SPECIFIC TOOLS | ||
| Initial Pollutant Buildup | Initiates the initial buildup data editor and enables the model to input these data for the Subcatchment. | |
| Infiltration | Initiates the infiltration editor and enables the user to input infiltration attribute data. | |
| Groundwater | Initiates the groundwater editor and enables the user to input groundwater data. | |
| Land Use Assignment | Initiates the Land Use Assignment editor and enables the user to input land use coverage data. | |
| Pick Receiving Node | Enables the user to pick an outlet node ( i.e., the node that receives runoff generated from the Subcatchment) for the Subcatchment. If this button is not available, please find the command in the Tools drop-down menu described above. | |
| NODE SPECIFIC TOOLS | ||
| Inflow | Initiates the inflow editor and enables the user to input node inflow data. | |
| Treatment | Initiates the treatment editor and enables the user to input node treatment function. | |
| CONDUIT SPECIFIC TOOLS | ||
| X Section | Initiates the cross-section editor and enables the user to input channel shape and size information. | |
 |
Corrosion | Initiates the corrosion editor and enables the user to input conduit alkalinity information. |
| Pump, Orifice and Weir Specific Tools | ||
| Initial Status | Activates the initial status editor and enables the user to specify initial status of the hydraulic structure. | |
| Simple Control | Initiates the simple control editor and enables the user to specify simple control rules for the link. | |
| Pump Specific Tools | ||
| Level Control | Initiates the Level Control dialog box and enables the user to automate the specification of pump control levels. | |
| Energy Rate | Initiates the Pump Energy Data dialog box for specification of electrical costs | |
| Pump Efficiency | Initiates the Pump Efficiency dialog box for specification of pump efficiency data |
Privileged and Confidential Communication: This electronic mail communication and any documents included hereto may contain confidential and privileged material for the sole use of the intended recipient(s) named above. If you are not the intended recipient (or authorized to receive for the recipient) of this message, any review, use, distribution or disclosure by you or others is strictly prohibited. Please contact the sender by reply email and delete and/or destroy the accompanying message.