Import and Export Manager in InfoSWMM and InfoSWMM SA
The Import Manager enables the modeler to import element data into InfoSWMM InfoSWMM SA (both graphical details and attribute data). Click on the following links for more information:
Launching Import Manager
To Launch InfoSWMM InfoSWMM SA Import Manager, do the following:
- From theInfoSWMM InfoSWMM SA Exchange menu select Import Manager. This will initiate the dialog box indicated below.

Contents of the dialog editor is described below.
| Name | Description |
| Import Element Type | Select the type of element for which an import file is to be created Conveyance Node (i.e. junction, outfall, divider, or storage unit) Conveyance Link (i.e. conduit, pumps, weir, orifice, or outlet). |
| Graphic Options | Disable Auto Length Calculation . If, checked, InfoSWMM will recalculate the lengths of conduits based on junction node and conduit vertices geometry. If unchecked, ensures that the Auto Pipe Calculation will not be used and that conduit lengths, when imported, will be populated as they are in the import file. |
| Import Options | Refer to the Import Options section |
| Source File | Refer to the Import Options section |
| Next | This button will initiate the Import Manager Field Mapping dialog editor that will enable you to map data fields from the imported file to the corresponding InfoSWMM field. |
Import Options
Specify the type, source and options of the data import into InfoSWMM
- Format - Choose from Delimited Text (comma, tab, etc.), ESRI Shapefile or MapInfo MIF/MID formats.

- Delimiter - With the delimited text option, choose the type of delimiter in your file (tab, comma, etc.) This option is only available when importing a Delimited text file. A delimiter can be defined as a data separator. Choose the appropriate delimiter from among the options above.
Additional Import Options
Data may be imported into a new InfoSWMM project or an existing InfoSWMM project. Choose from the following options based on the type of import:
- Create New Records - Choose this option to Create new records in the InfoSWMM database. Use this when creating a new InfoSWMM project. When importing to an existing project use this option if new data is to be added.
- Update Existing Records -Using this option will overwrite any existing InfoSWMM database records that match data from the import file records. Use this option when updating your InfoSWMM project.
Additional Import Options - Data may be imported into a new project or combined with an existing project. Choose from the following options based on the type of import:
- Create New Records - Choose this option to add new records in the project database. Use this when creating a new project. When importing to an existing project use this option if new record data is to be added.
- Update Existing Records -Using this option will overwrite any existing database records that match data from the import file records. Use this option when updating your project database.
· Note: You may choose to check both options in order to simultaneously update existing and create new records in your project.
- Skip Field Title First Row - This option is only required for delimited text files where the first row contains header data or title information for the import file.
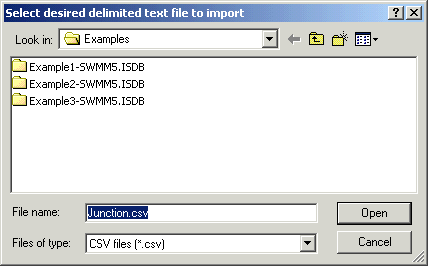
- Source File - Choose the file on your network or your hard drive that you want to import. Click on the Browse
 button to bring up the navigation dialog box. Click on Open to choose the file and return to the Import Manager.
 - No Geometry Update - The checkbox for “No Geometry Update” is enabled when you select “Shapefile” or “MIF/MID” format because these two formats have geometry information, but “Delimited Text” does not.
You may choose to check both options in order to simultaneously update and create new records in your InfoSWMM project.
- Skip Field Title First Row - This option is only required for delimited text files where the first row map happen to contain a header or title of the import file.
- Source File - Choose the file on your network or your hard drive that you want to import. Click on the More icon to bring up the navigation dialog box. Click on Open to choose the file and return to the InfoSWMM import manager.
Import Manager Field Mapping
Use this to associate the Imported fields with the different InfoSWMM Data fields. The list of available field in the newly to be imported file are included under the Source Data Fields section. The available InfoSWMM data fields are included on the right window. Left click on any field under the source Data fields and left click on the appropriate InfoSWMM data field and then click on Map to associate the two fields. the most important step in this process is the InfoSWMM ID mapping where the field from the Source data field that contains a unique identifier is declared as the InfoSWMM ID.

Contents of this dialog editor are:
| Button | Name | Description |
| Source Data fields | The source data fields are displayed in this section of the Import Manager. These data fields need to be mapped to the InfoSWMM data fields. | |
| ID Mapping | Mapping the ID field is the most essential step in the import process. It is necessary to have a field in the Source Data fields that uniquely identifies the other properties of the elements being imported into InfoSWMM . Choose this field using the down arrow in this section to Map the InfoSWMM ID. InfoSWMM will now assign the ID in the specified source field and create elements with this ID. | |
| Add All Fields | When this button is clicked, all fields from the available fields box will be moved to the display fields box | |
| Add Single Field | Select one record from the available fields box, click the Add Single Field button and the field is now added to the import file. | |
| Remove Single Field | Select one record from the display fields box, click the Remove Single Field button and the field is now removed from the import file. | |
| Clear All Mapping | Resets all field mapping and ID mapping | |
| Load | Clicking this button will open a previously saved field collection table. This is a time saving feature that allows the user to create an import template to be later recalled by the open feature. | |
| Save | By using the save feature, the user can store an export template to a field collection folder. With a saved folder, an import file can be recalled during any import procedure. | |
| Clear All Fields | Clicking this button clears all field mapping | |
| Back | Returns to the Import Manager Source & Options dialog | |
| Finish | Choose this to conclude the import process. The export file has now been saved as per your choice and contains all the selected data fields | |
| Close | Close the dialog editor |
Export Manager
The Export Manager enables the modeler to export InfoSWMM's element data (both graphical details and attribute data).
Click on the following links for more information:
To Launch InfoSWMM Export Manager, do the following:
- Fromthe InfoSWMM Exchange menu select Export Manager. This will initiate the dialog box indicated below.
Contents of the Export Manager dialog editor is described below.
| Name | Description |
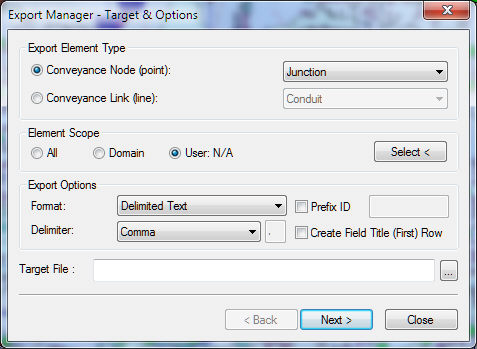
| Export Element Type | Select the type of element for which an export file is to be created Conveyance Node (i.e. junction, outfall, divider, or storage unit) Conveyance Link (i.e. conduit, pumps, weir, orifice, or outlet). |
| Element Scope | The element scope is used to create the elements made available for an export. The 3 element scope options are:
·
|
| Export Options | Refer to the Export Options section |
| Target File | Refer to the Export Options section |
| Next | This button will initiate the Export Manager Field Mapping dialog editor that will enable you to mapInfoSWMM InfoSWMM SA data fields to the corresponding field on the exported file. |
Export Options
The options allow the user to specify the type of export file to be created and its destination.
- Format - Choose from Delimited Text (comma, tab, etc.), ESRI Shapefile or MapInfo MIF/MID formats.

- Delimiter - With the delimited text option, the type of delimiter to use in the export file (tab, comma, etc.) This option is only available when exporting to a Delimited text file. A delimiter can be defined as a data separator. For instance if comma is chosen as the delimiter, commas will be used to separate the different data chosen for export. You may choose the delimiter from among the options below:
- Create Field Title (First) Row - Create a field title. This choice is available only with the Delimited Text option. The title or the column header will appear in the first row of the export file.
- Prefix ID - Only applies to the delimited text option. All elements exported will have the Prefix ID inserted before their unique identification. If this box is not checked, no prefix will be inserted.
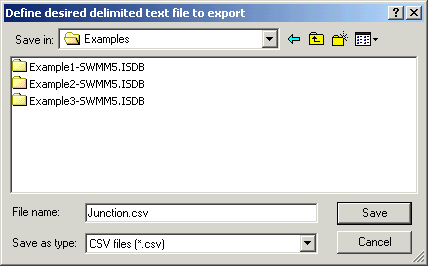
- Destination File - Choose the location on your network or your hard drive to save the exported file. Click on the More icon
 to bring up the navigation dialog box. Click on Save to return to the InfoSWMM InfoSWMM SAExport Manager.
Export Manager Field Mapping
Use this to select the export data fields from among the available ones to export. The available InfoSWMM InfoSWMM SA fields are listed under the Available Data fields section of the dialog box. Click on any of the fields that you want to export and click on the Add button. Choose Add All to export all the fields.

Contents of this dialog editor are:
| Name | Description |
| Available Data fields | Lists all available fields that have not yet been chosen for inclusion in the export file. If a field has already been selected, it will appear in the Display Fields list to the right of the Available Fields list. Only those fields associated with the selected data categories in step 1 will be available for selection. |
| Export Data Fields | Lists all fields selected for inclusion in the export file. The fields will be displayed in the order that they appear in the Display Fields list. The field listed at the top is displayed first in the export data file while the field listed at the bottom of the Display Fields list is displayed at the end of the export data file. Use the Move Up or Move Down buttons to set the field display order. It is normally a good practice to include the ID field for all InfoSWMM Exports since the ID field is the primary key and all other fields relate to the element with the specified ID. |
| Add | To use this icon, select one record from the available fields box, click the Add Single Field icon and the field is now added to the export file. |
| Add All >> | When this icon is used, all fields from the available fields box will be moved to the display fields box. |
| < Remove | To use this icon, select one record from the display fields box, click the Remove Single Field icon and the field is now removed from the export file. |
| << Clear All | When this icon is used, all fields from the display fields box will be removed from inclusion in the export file. |
| Save... | By using the save feature, the user can store an export template to a field collection folder. With a saved folder, an export file can be recalled during any export procedure. |
| Load... | This icon will open a previously saved field collection table. This is a time saving feature that allows the user to create an export template to be later recalled by the open feature. |
| Move Up | Using the move up and move down icons, the user can order the fields for export. |
| Move Down | Using the move up and move down icons, the user can order the fields for export. |
| Back | Use this to return to the previous Dialog box. |
| Finish | Choose this to conclude the Export process. The export file has now been saved as per your choice and contains all the selected data fields |
| Close | Close the dialog editor. |
Privileged and Confidential Communication: This electronic mail communication and any documents included hereto may contain confidential and privileged material for the sole use of the intended recipient(s) named above. If you are not the intended recipient (or authorized to receive for the recipient) of this message, any review, use, distribution or disclosure by you or others is strictly prohibited. Please contact the sender by reply email and delete and/or destroy the accompanying message.