General Description of Scenario Explorer and how to Compare Scenarios in InfoSWMM and InfoSWMM SA
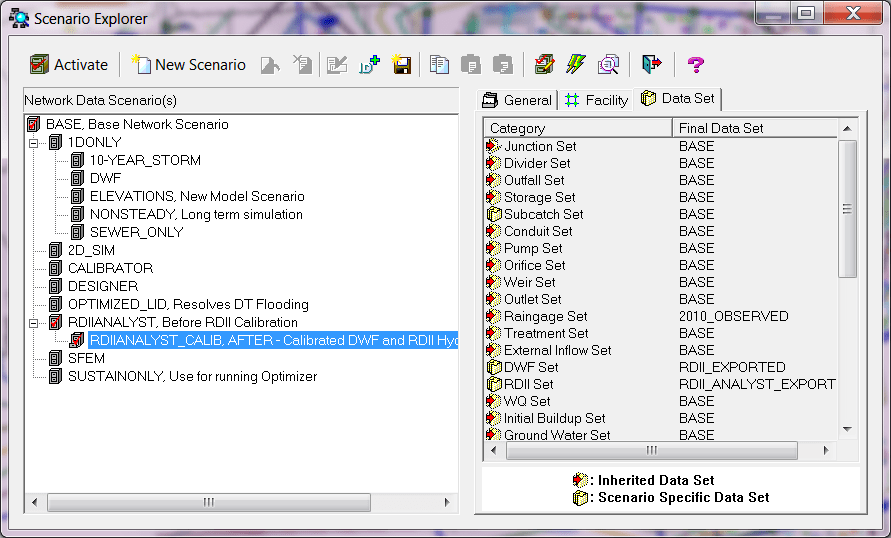
Launch Scenario Explorer by selecting Scenario Explorer from the InfoSWMM and InfoSWMM SA Scenario Menu or by clicking the Scenario Explorer button (![]() ) on the InfoSWMM H2OMap SWMM InfoSWMM SA Control Center Toolbar Standard Toolbar . You will see the following dialog box.
) on the InfoSWMM H2OMap SWMM InfoSWMM SA Control Center Toolbar Standard Toolbar . You will see the following dialog box.
Contents of the scenario Explorer dialog box are briefly described below:
| Button | Name | Description |
| Activate | Activates the selected/highlighted scenario. | |
| New Scenario | Creates a new "child scenario" under the currently selected/highlighted scenario | |
| Reset Changes | Resets the selected/highlighted scenario to its original status | |
| Delete Scenario | Deletes the currently selected/highlighted scenario | |
| Edit Scenario Description | Allows you to change the description of the currently selected/highlighted scenario | |
| ID Counter | Use this to set the automatic Scenario ID assignment option by selecting the Prefix, Id counter, and the increment steps as you wish. | |
| Save as Default | Saves the selected scenario as a default and automatically inherits its contents to newly created scenarios | |
| Copy | Copies the input data information of the selected/highlighted scenario to the clipboard. After using the tool, the Paste and Replace and Paste as Child tools will be activated and can be used to transfer the information to another scenario. | |
| Paste and Replace | Pastes the input data information copied to the clipboard and replaces the existing data of the currently selected/highlighted scenario | |
| Paste as Child | Pastes the copied scenario from the clipboard and saves it as a new "child scenario" under the currently selected/highlighted scenario | |
| Edit Active Scenario | While working in the Scenario Explorer, the currently active scenario cannot be changed or edited. To edit the datasets associated with the active scenario, click this Edit Active Scenario button. To change items on the General or Facility tabs, you must make another scenario active (at least temporarily). | |
| Batch Run | With the Batch Simulation Manager, the user can select the desired scenarios and run each model in a "batch" (i.e., at a time). | |
| Compare Scenarios | Opens the Scenario Data Comparison Report. The last comparison will be displayed. The report has a button to create a new comparison if desired. | |
| Exit | Exit Scenario Explorer | |
| Help | Opens this help file | |
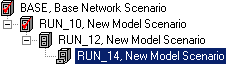
| Scenario Display Window | IDs and descriptions of the available scenarios is displayed here. In addition, the relationship between a parent scenario and its child, defined as inheritance, is displayed in this box. InfoSWMM shows this relationship in the form of a directory tree. All scenarios are children of the *BASE* scenario until some element of the child is made unique from the parent (such uniqueness comes in the form of data sets, facility sets, or option sets). In the example below, RUN_14 is a child of RUN_12, RUN_12 is a child of RUN_10, and RUN_10 is a child of BASE. When a change is made to a parent, unless some facet of a child is unique, it will inherit the change through inheritance.
|
|
| General Tab | The Scenario Explorer - General tab enables editing of InfoSWMM H2OMap SWMM InfoSWMM SA 's simulation and report option parameters, and the climatology settings for the selected/highlighted scenario. | |
| Facility Tab | The Scenario Explorer - Facility tab enables adding/removing facilities to/from a scenario. | |
| Data Set Tab | The Scenario Explorer - Data Set tab enables modifying input data for InfoSWMM H2OMap SWMM InfoSWMM SA 's visual and non-visual data objects. |
Compare Scenario Data (Input Data)
InfoSWMM H2OMap SWMM InfoSWMM SA’s Compare Data Scenario command allows you to easily monitor the differences in input data between any two scenarios in a model.
Click the following links to learn more:
Initiating Compare Scenario Data
To initiate the Compare Data Scenario dialog box indicated below, do the following:
Select Compare Data Scenario from the InfoSWMM H2OMap SWMM InfoSWMM SA Scenario Menu. This will display the following dialog box.

Contents of the Compare Data Scenario dialog box are briefly described below:
| Name | Description |
| Scenario #1 | The first scenario to be compared |
| Scenario #2 | The second scenario to be compared |
| Save Results to Selection Set | You can save selection sets based on the three analysis results. These can be used for later reference if you wish to make amendments based on these results.
|
| Reset Selection Set | You may want to use a regular re-setting for the selection sets created for Compare Data Scenarios. If checked, this implies that, each time the Compare Scenario command is carried out, the existing selection set is cleared and replaced by the new result. |
| Report Color | Lets you customize the colors used when displaying the comparison results |
| Compare | Executes the comparison. Click the compare button to perform the comparison. |
| Cancel | Use this to close out of the Compare Scenario dialog box. |
Scenario Data Comparison Report
Scenario Comparison results are presented in a format that allows the user to readily compare each scenario’s data. When the comparison analysis is completed, the model will be presented with a display similar to the report indicated below. This provides users with summary of all the data differences associated with the scenarios. The following is what each of the summaries describe:
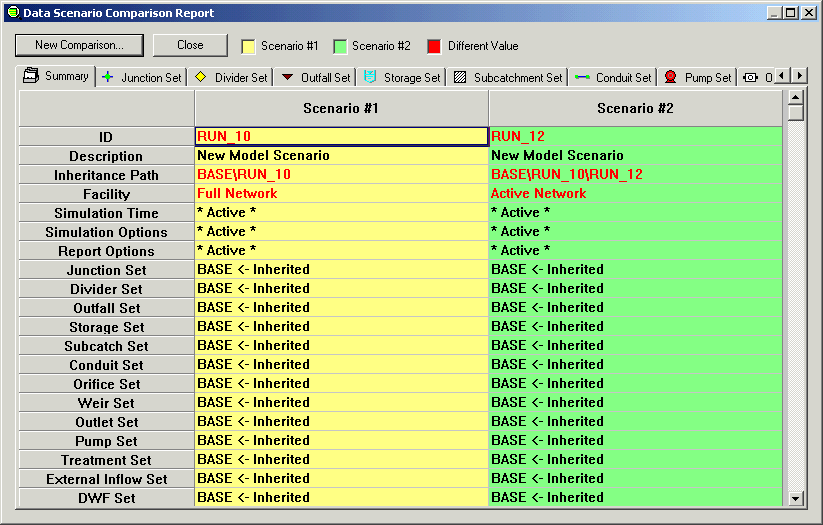
Contents of the Data Scenario Comparison Report are briefly described below:
| Name | Description |
| New Comparison | Initiates a compare data scenario editor and enables the user to do another scenario comparison. |
| Close | Close the scenario comparison report dialog box |
| Scenario #1 | Indicates the display color used for scenario #1 |
| Scenario #2 | Indicates the display color used for scenario #2 |
| Different Value | Indicates the display color used to show elements in either scenario that has different attribute values |
| Summary Tab | This provides users with summary of all the data associated with the scenarios. The following is what each of the summaries describe:
|
Compare Scenario Data Methodology
To Compare two Scenarios do the following:
- Select the first scenario you wish to compare from the Scenario #1 drop down list.
- From the Scenario #2 drop down list, select the scenario you wish to compare to the first scenario.
- If you wish to save the comparison result, you can save selection sets to refer to at a later time (i.e. from the Domain Manager). For information on creating a selection set, refer to selection sets. you must have different selection sets selected for each comparison result that is to be reported. If you wish to overwrite an existing Selection Set, ensure that the Overwrite option is checked.
- You can select an existing Selection Set to use, or you can create a new selection set. If you wish to save a Selection Set based on the elements that are in Scenario #1, but not in Scenario #2, check the Save elements that exist in Scenario #1 only option.
- Alternately check the Save elements that exist in Scenario #2 only option to save a Selection Set based on the elements that are in Scenario #2, but not in Scenario #1.
- If you wish to save a Selection Set based on elements that have different values between the two scenarios, check the Save elements that have different values option.
- To alter the colors selected for each of the Compare Scenario outputs, click on the color swatch you wish to change, and a color pick dialog will appear for you to select a new color. Each color that is selected in this dialog will be reflected in the Data Scenario Comparison Report legend.
- To conduct a comparison of scenarios, press the
 button. Results will be displayed in the scenario comparison report.