Query Reports in InfoSewer
Like a customized report, a query report is used to selectively choose which input and output data will appear in a report. However, unlike a customized report, a query report is required to relate data from an Output Relate with output data in a report format. In other words, the only way to see output data in a report format is to create a query report that contains a desired output relate. To follow a step-by-step procedure in creating a query report, click here.
To create a query report, from the Tools menu, select Query Report. Once this is done, the following dialog box will appear. Click on any portion to learn more.


Once the OK button is clicked, a query report is created as shown below.
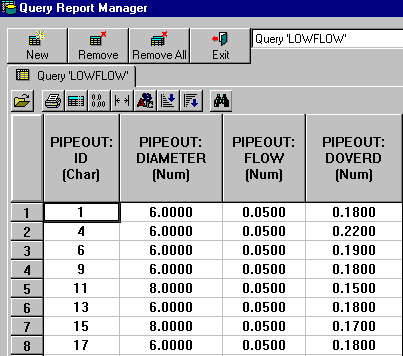
Click here to learn more about the fields presented in a query report.
How to Query Model Results
This quick tutorial will guide you through the query report building process and show you how to create and link an output relate to a query report.
Run a Hydraulic Simulation
- Using the Run Manager, run either a steady-state or EPS simulation.
Establish Output Relate
- Open the Output Relate Manager under the Operation Data tab under the Control Center by creating a new output relate called "PIPEOUT"
- Once the dialog box is open, check the Automatic Update box, select the *Active* Target Scenario, Standard Hydraulic as the Simulation, EPS Gravity Main Report as the Desired Output Report, and 0 for the Desired Report Page (same as timestep 00:00 hrs).
- Once step 3 is complete, click on the "Update Current Relate Now" button. This will ensure that the output results for the latest model can now be queried by the Query Report Manager.
- Choose the “Save” button to save the relate and then choose the “OK” button to close the Output Relate Manager.
Generate Query Statement
- Open the DB Query Manager under the Control Center by creating a new query called "LOWFLOW, Pipe Flow < 1.5 cfs".
- Now associate the “PIPEOUT” output relate with the new query by clicking on the Output Relate tab.
- From the drop down box at the bottom of the dialog box, select "PIPEOUT" and click on the “Add Relate” icon just to the right. “PIPEOUT” is now associated with the DB Query.
- Choose the “Verify All” button to ensure proper association to the selected output relate.
Now Build the Query Statement
- Go back to the Query Statement tab and select Pipe as the element type then click on the query builder icon
 to build a query statement.
 - Choose the “Clear” button at the bottom right-hand corner of the Query Builder to remove any existing query from the Query Builder.
- Click once on “PIPEOUT-> FLOW” data field. Click once on the “<” operator and type “1.5" in the entry field directly below the list of operators.
- Choose the “Add” button to add the query statement.
- Choose the “Validate” button to ensure that at least one pipe matches the criteria “FLOW < 1.5" If the “Invalid Query Statement or Empty Query Result” message appears, then change the query statement to a valid statement with a non-null result. If the “Valid Query Statement” message appears, then choose the “OK” button to close the Query Builder dialog box and return to the DB Tables dialog box.
- Choose the “Save” button to save the query and the “OK” button to close the DB Query dialog box.
Apply Query and Create a Domain
- Open the Domain Manager (Tools -> Domain -> Domain Manager).
- Choose the “DB Query” option and select the LOWFLOW database query from the adjacent drop down box.
- Choose the “Add” button to highlight all pipes meeting the query criteria: Pipes with flows less than 1.5 cfs at the user-selected EPS timestep. All pipes meeting the criteria will be highlighted (default color is red – use the Preferences command to change the highlight color).
- Choose “Close” to close the Domain Manager dialog box.
Create Output Report
- From the Tools menu, select Query Report.
- From the Source Query ID, select the LOWFLOW database query.
- The Available Fields box will show all of the fields available from the PIPEOUT output relate while the Display Fields box shows which fields will be included in the query report.
- Use the Display buttons to add and remove fields from inclusion in the output report.
- When all desired fields have been added to the Display Fields box, click OK and the query report will be generated in the Output Report Manager.
- Review and print report as desired.