InfoSWMM SA Home Menu
The InfoSWMM SA Home Tab is a collection of shortcut buttons to access commonly-used InfoSWMM SA commands.

Map Inquiry Ribbon
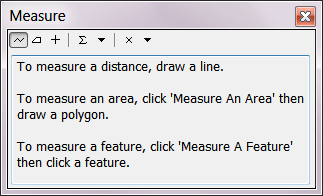
 measure the distance on the InfoSWMM SA Map. This tool will not work if the spatial coordinates are not defined in the InfoSWMM SA model
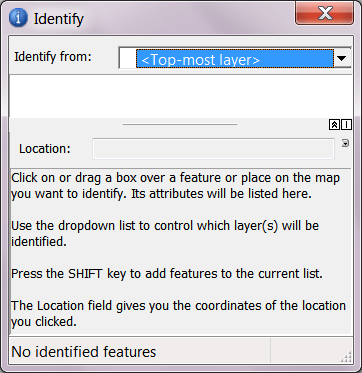
 identify an item on the InfoSWMM SA Map.
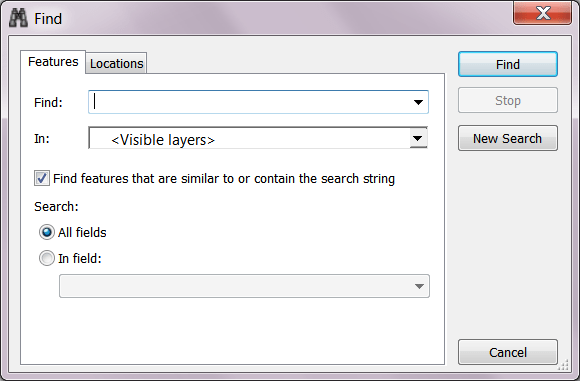
 find an item on the InfoSWMM SA Map.
Project Ribbon

The Preferences command is used to control the InfoSWMM SA system settings. All changes made on the Preferences dialog box must be applied prior to closing the dialog box. Many preferences set with this command will be reflected as the default choices on other dialog boxes. You may change those settings as desired on those dialog boxes.
 The Run Manager is used to perform simulations and manage simulation options.
 The Batch Simulation Manager is used to run models for numerous user-selected scenarios in a single operation.This command is especially useful where several simulations are simultaneously required for a large model. With the Batch Simulation Manager, the user can select the desired scenarios and run each model in a "batch" process.
 The Output Unit Manager is used to specify the units of measurement for simulation result variables to units other than the defaults. You may choose from any pre-defined units or may define user-specified units by applying the appropriate conversion factor. In changing units from the Output Unit Manager, the user is able to create and compare both reports and graphs from the same model run without having to re-run the model.
 Model Tracker is a collection of tools which enable InfoSWMM SA users to manage "unstructured" model related supplemental information. These pieces of information are available as a free text document or Model Note. Through the various phases of model development, many pieces of auxiliary information can be captured and stored as a model note document. The Search and Custom Query capability that is provided with the Model Tracker allows the user to easily locate the desired archived model information. The Model Tracker consists two main components to achieve its full functionality, the Model Tracker to manage the model information and the Model Notes Editor where the supplemental information is created and edited.
 The Model Notes editor is a rich text editor that allows the storage and retrieval of text based model information. Through the use of the various function on the toolbar the model notes editor allows you to capture text directly from the InfoSWMM message board, capture junction and conduit IDs, Insert hyperlinks from various data sources, such as email, web page, documents and documents on ftp sites. You can enter a date/time stamp as well as use the various text formatting functions to create and edit model notes. Model Notes works in conjunction with the Model Tracker to store manage and retrieve model notes archives. See ModelTracker.

Report Ribbon

The Output Report Manger is where the user can generate reports and graphs for any element(s) as modeled in InfoSWMM SA.
 A query report is used to create a sophisticated and very flexible report that contains only the user specified input variables and output results. Input variables are accessed thorough pre-defined DB queries and the output results are accessed using pre-defined output relates. More than one output relate could be created and used to build a query report thus offering the flexibility to combine output results corresponding to different modeling scenarios, different report time instants, etc. Query report has some similarity with customized report. However, unlike a customized report, a query report accesses inputs through DB queries and outputs through output relates. Because of this, query report offers much more flexibility to construct a sophisticated and highly customized report that meets the users interest.
 The customized Report provides you with a means to customize your report and to create a combination of input and output data.
 The Query Summation Report may be used in conjunction with DB Queries to determine and evaluate the different attributes associated with the InfoSWMM SA data elements that satisfy the DB query.
 Input Profile Plot of the input node and link elevation, diameter and length. After clicking the Profile Plot button ( ), select one or more conduits. You can right-click to view a menu that allows you to change the default method of selection on the fly. Press the Enter key or the right mouse button to terminate the conduit selection process. You are notified if you attempt to re-select a previously selected conduit, or a conduit that is not directly connected to the previously selected conduits via a common node.
 Output Statistics Manager -The statistics module separates model outputs ( e.g., runoff from a Subcatchment) in to events, performs statistical analyses, and reports basic statistical information including extreme values (i.e., minimum and maximum), the first three moments (i.e., mean, standard deviation, and skewness), frequency and duration of an event, exceedance frequency, and return period.

Domain Ribbon
 Domain Manager - Use this button to open the Domain Manager Dialog Box. See: Domain Manager Dialog
 Enlarge Domain - Use this button to add elements such as pipes, pumps, valves, junctions, reservoirs and/or tanks to your new or existing domain. You can also use the Domain manager to do the same.
 Reduce Domain - Using this feature allows the user to graphically remove elements from a domain by window selection. (Note: To select single entities, hold the <Shift> key and select individual elements.)
 Clear Domain - Use this button to clear the presently active domain. Alternatively you can use the Domain manager to clear the domain.
 Zoom to Domain - Press this button to zoom to the extents of the current domain
Facility Ribbon
- Facility Manager - Use this button to open the Facility Manager Dialog Box. See: Facility Manager Dialog Box
 Activate Elements - Use this command to activate facilities on your network map. The facilities thus activated will be considered active during the simulation run. You can also conduct the same operation through the InfoSWMM SA Control Center -> InfoSWMM SA button -> Tools -> Facility Manager command.
 Deactivate Elements - Use this button to deactivate facilities from your network. Deactivated elements will either be removed from the map display or shaded grey depending on the Project's Display Settings. The facilities thus deactivated will not be considered during the simulation run. You can also conduct the same operation through the InfoSWMM SA Control Center -> InfoSWMM SA button -> Tools -> Facility Manager command.
 Reset Facility - You may use this button to reset your facilities. Resetting the facility set will activate all the elements implying that your entire network will be displayed and considered for simulation when this command is used. Alternatively you may use the Facility manager to conduct this operation.
 Activate All - Adds the entire suite of available network components to the active facility set.