2.3 Creating The 2D Zone in InfoSWMM 2D
Step 1 - Add ground surface data to the map
- Click the ArcMap Add Data button

- Browse to the location of your ground surface layer. Many different formats are supported.

Step 2 - Create 2D Simulation Polygons
- Click the Create 2D Polygon button
 from the InfoSWMM 2D Toolbar
 - Digitize the polygon by clicking in the ArcMap Drawing Area on the first vertex then click additional vertices as needed. Double-click on the last vertex to complete the polygon.
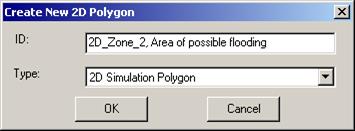
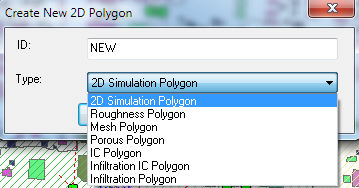
- Give the polygon a unique ID (and optional description if desired). Choose '2D Simulation Polygon' as the Type.
- Notice that the attributes of the polygon you just created are shown in the 2D Browser.
- Adjust the attributes as needed to suit your modeling situation. For a description of attributes, see 2D Simulation Polygon topic in the on-line help.
Step 3 - Create Optional 2D Zone Modification Objects as Needed
Determine the which 2D Zone modification objects you will need to correctly model the characteristics of your ground surface and any flow obstructions in the 2D Zone. The available modification objects are:
- 2D Boundary

- 2D Break Polyline

- 2D Initial Conditions Polygon

- 2D Mesh Polygon
- 2D Porous Polygon
- 2D Porous Wall Polyline
- Infiltration IC Polygon
- Infiltration Polygon
- 2D Roughness Polygon


The 2D Zone Modification object creation tool buttons are used to create the objects (![]() ). Polylines and polygons are digitized by clicking the point in the map where you want the first endpoint / initial vertex, then click intermediate vertices and finally double-clicking the endpoint / final vertex to complete the sketch. See the on-line helpfile for details about each modifier object.
). Polylines and polygons are digitized by clicking the point in the map where you want the first endpoint / initial vertex, then click intermediate vertices and finally double-clicking the endpoint / final vertex to complete the sketch. See the on-line helpfile for details about each modifier object.
Step 4 - Add 2D Point Source Objects
If there are any sources of additional flow onto the ground surface such as water springs or artesian wells, add them to the 2D simulation by adding 2D Point Source. Use the Create 2D Point Source tool ![]() to add point sources. After adding the point to the map, a Time Series representing the flow must be specified for the point source.
to add point sources. After adding the point to the map, a Time Series representing the flow must be specified for the point source.
Step 5 - Create Initial Conditions Settings
It is often helpful to set up initial conditions for the 2D Zone. This is done by creating Initial Condition Settings and assigning them to 2D Simulation Polygons and IC Polygons. Initial Conditions associated with IC Polygons will override Initial Conditions associated with the 2D Simulation Polygon at that location.
- Click Initial Conditions from the InfoSWMM 2D menu.
- Click the New button
 to create a new Initial Condition.
 - Choose which IC Polygon or 2D Simulation Polygon that the Initial Conditions should apply to.
- Choose whether the initial level is specified by Depth or Elevation and enter the appropriate value.
- Enter initial velocity information as Velocity and Direction (measured counter-clockwise from due East)
- Repeat steps 2-5 for each IC Polygon or 2D Simulation Polygon that you wish to create Initial Conditions for.

Privileged and Confidential Communication: This electronic mail communication and any documents included hereto may contain confidential and privileged material for the sole use of the intended recipient(s) named above. If you are not the intended recipient (or authorized to receive for the recipient) of this message, any review, use, distribution or disclosure by you or others is strictly prohibited. Please contact the sender by reply email and delete and/or destroy the accompanying message.